
Diamonds Are Forever
 by Stephanie Allen-Krauss, 2019
For the past ten years I’ve been designing and hooking geometric rugs… and loving them! I’ve learned a few things along the way and incorporated some new techniques taught to me by others.
My geometrics are pretty big so before starting a large project, I experiment with a small sample. In this way I can play with the size of the shapes and the color plan. Sample: 18" x 24"

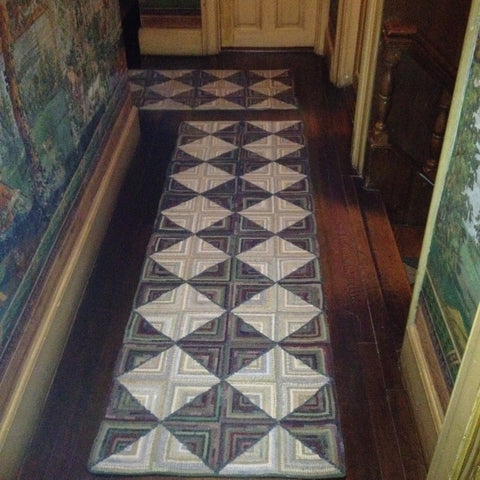
I started my latest project about 4 months ago by determining the size that would fit well in the long hall being redecorated. The finished runner needed to be 28 inches wide by 9 feet long. I measured the linen carefully and cut 36 by 116 inches because I like to have at least 4 to 6 inches extra on each side beyond the hooking. Linen is dear so I “measure twice; cut once”.
My next step was to draw a grid on the linen which is how I start all my geometrics. This insures that the design will lay straight when hooked. I dragged a pencil along the straight of the grain or “in the ditch” as some people say. I had already worked out the size of the diamonds I wanted in my sample piece, 4 by 6 inches, and then I used a yard stick to draw a diagonal line intersecting each cross of the grid. I darkened the diamond lines with a permanent marker so as not to get confused when hooking.

Before I start the hooking, I sometimes machine stitch the binding onto the pattern which makes the finishing step go along much quicker, but I need to make certain of my color plan first so I don’t choose the wrong color binding. For this rug I found a hand-woven binding in reds that added a small but elegant touch to the edge. Of course this is only one way to finish a rug, and we know there are many different ways.
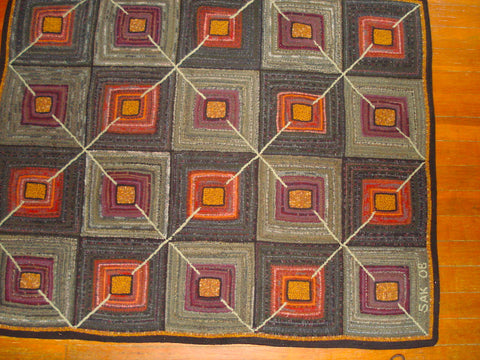
Now for the fun part… playing with wool and hooking! I sorted my wool into 4 piles; reds, blues, neutral light colors and brown-golds. I wasn’t exactly going for a patriotic theme, so I included many different colors of blue, from turquoise to Navy and reds that included rusts to bright cherry. I love mixing in textured wool too. This allowed me the freedom of a ‘hit-or-miss’ theme while still having a planned sequence of color for each diamond. I hooked 2 rows of red, 1 row of neutral, 2 rows of blue, and filled with a gold or brown. The alternating diamonds were 2 rows of blue, 1 neutral, then 2 of red with gold or brown in the center which is what I used for the line separating the diamonds. I wanted something a little different for those dividing lines separating the diamonds so instead of using one solid color, I decided to vary the color from deep brown-gold to bright gold or yellow. I wondered if this might give the lines a kind of shimmer. Look closely at Photo 4 and you’ll notice the different browns, golds and yellows.

The next step in my color planning evolved as I started hooking the center diamonds. You may notice in my sample piece that the color pattern of the diamonds comes right to the edge. It almost looked like the rug was cut off rather than having a definite plan for the edge design. To my eye, the rug really needed some kind of a border, but I didn’t want to introduce a straight line around the edge so I decided on an ‘implied border’. The 1/2 diamond shapes were perfect for the implied border and alternating the solid red and blue colors added just the right touch.

Almost the last thing I do to any rug I create is to hook the “Secret Message”. Thanks go to Beverly Conway of Middlebury, Vermont, for this wonderful way of adding text without having it show on the front of the rug. Now I sign all my rugs this way so that in the future if the label is worn off, there is still some clue as to who hooked the rug and in what year.

This technique was a little tricky at first. I drew the letters and numbers a legible size of about two inches then I used a light table to trace my initials and the date onto the backing. The text needs to be reversed so that it’s backwards on the front but is readable on the back. I used a dark-colored #3-cut strip and hooked the backwards letters and numbers very low. Using #8-cut strips or larger, I hooked the design around these low loops, pulling the loops a little higher than normal. I hooked right up to the #3 loops packing my larger loops within one hole of the smaller ones, but not crossing over in the back. This way the shape of the number or letter on the back is not covered. The #8 loops should ‘umbrella’ over the smaller loops.

I love my geometric rugs and look forward to starting another one!


-
Stephanie Allen-Krauss
Comments on this post (0)